Friday, December 30, 2011

Tuesday, December 27, 2011

christmas tree stirring whisk

this czech tradition is a wonderful way to upcycle your christmas tree - make some stirring whisks!!!...lovely and USEFUL christmas memorabelia, that you can use all year round! great for mixing thin or medium thin batters and sauces.

eventhough my grandfather was never much of a crafty person, he was very much a traditional person and this is one czech tradition he followed :) he made these over 30 years ago...and i stir crepe batter with them almost every morning :) but i wish he had carved the dates on the handles....

steps:
CUT,
PEEL,
SHORTEN,
let DRY

- i've never made one before, this year will be my first and we usually "put away" our tree late january (...i love having our christmas tree as long as possible!!!), so here are some straight forward photo directions i found, and when i make mine, i'll let you know how it turned out ;)
- if your tree will be dry like ours when you do it - my dad said he thinks my grandfather soaked it in hot water before carving off the bark.
p.s. to use - clasp hands flatly with the handle in the palms of your hands and roll your hands alternately forward and backward to make the whisk twirl!


Saturday, December 10, 2011

yummy gingerbread cookies

i n g r e i e n t s :
500 g flour
100 g sugar
250 g honey
1/8 l   water
1 egg
2 tsp of gingerbread spice mix*
2 tsp of holland cocoa
2 tsp baking soda

* i used this spice mix(but not the recipe),
   or here's a homemade mix


 m i x,   k n e a d,   m a k e,   b a k e:

1. m i x  flour, spice mix and soda in a bowl

2. simmer water, sugar and honey together

3. while still warm, pour sugar-honey-water into the flour
mix and  k n e a d  together (by hand or - i used my kitchenaid)
4. add egg and  k n e a d  again
5. refridgerate dough for a couple of hours
6. m a k e - roll out dough and cut out cookies
(note: we also used cookie stamps and a knife to decorate)
7. b a k e  at med-high heat and remove from oven shortly
after the cookies rise (it also depends on how thin you make your
cookies, but we baked ours at 180° C for about 3-4 minutes)


optional:
- as soon as you take them out of the oven - while still hot, glaze with (very well) beaten egg.
tip: if you want to have darker brown cookies, add 1-2tsp  of cocoa to the egg.


optional2:
 - when cookies are cool(i usually do it the next day), decorate with icing. 
tip: if you're having a hard time making straight lines with your icing, try making a line of dots or dashs(that is, if your icing is not too runny), looks better than a runny line! and makes the cookies cuter!

if you intend to store them, store in a container with a cinnamon stick, a few cloves and vanilla bean stick :)

p.s. they make lovely ornaments!


Tuesday, December 6, 2011

winter is here!

today we received our first s n o w  - yay!!!
...and it's finally starting to feel christmasy :)

p.s. i actually already posted this little guy last winter, but i accidently
erased the post, and now seemed like the right time to repost him :) 

Monday, December 5, 2011

beautiful paper cutouts

Markéta and Petr Vránovi design and sell beautiful cutouts with traditional motifs.


i bought a couple of sets 3 years ago and this is a comet from one of the xmas sets. they do require patience, but they are well worth it!!!...i copied mine onto card stock, cut out with an xacto knife and hung it with some thread. and i hang it in the window every christmas :). such lovely cutouts really give you an appreciation of how beautiful just plain ol' paper can be!

felt conifer christmas garland

....same directions as my garland wand,
only(as you can see) i didn't make such
large gaps in between the felt strips.
- my strips are approx. 3cm wide.

p.s. - place your strips onto your sewing
machine - makes the "feeding" go so
much more faster, than when you have
them on the table....found that out when
i was almost finished.

p.p.s. - a wreath would be nice too!


         p.p.p.s.  h a p p y  second advent sunday!

Friday, December 2, 2011

easy standing felt christmas tree

 i was making an ornament-a-day felt xmas tree for the boys, and Ji wanted to make his own, so we made an easier version for him - not that mine is anything difficult, but i was making a sewn and stuffed version that will have a wooden stand...that i still need to finish :s .....Ji dressed his already :)
  
Ji's tree:
corrugated cardboard
felt
toothpick
tools: pencil, scissors, glue stick
  
directions:
1. CUT OUT cb triangle and 2 rectangles (stand)
2. TRACE, CUT and GLUE felt
3. make STAND
DECORATE!!!


 1. cut out the triangle with the ribs going verticallly - this is important so you can stick your toothpick into one of the ribs (that way, it will be hidden and won't make a bump under the felt).
2. cut the triangles a little larger than the drawn triangle - it looks better ;), use 2 different greens - more fun :), glue with glue STICK - liquid glue could soak through the felt.
3. glue the 2 rectangles together (plain or "x"), make a hole in the center w/ your toothpick, then apply glue to both ends and stick one end into your stand and slide other end into the center rib of the cardboard

decorate!!!:
with felt scraps, thread, string....anything that will latch onto the felt (.....or when doing with older children you can use pins to pin on just about anything!)
or you can glue on your "ornaments", but i like the no-glue method more, since you can redress your tree as you like :)
tip: we found it best to decorate by holding the tree in the air by its toothpick - gives you more control   

Thursday, December 1, 2011

favorite tractor

Ji got this wooden tractor and wagon from my mom's good friend for christmas 3yrs ago and he has been playing with it ever since  - almost every.single.day....literally!

it has rooftop stearing, and a dumping wagon and is very durable! he loads the wagon with all kinds of things - blocks, animals, cars, "mail", etc. and drives them from place to place.....sometimes even to clean-up!

he just loves his tractor so :)!

Sunday, November 27, 2011

Friday, November 4, 2011

LOS - legos on a string

Ji is really into making lego planes lately, so we decided to fly them :)


i used my cordless driver with a tiny 0,5mm drill bit
p.s. if you don't have any tiny bits, get some -
they come in handy for small projects like this!


make mobiles, pull toys or just hanging art!


Tuesday, October 25, 2011

best ever liver-pork-pâté!

this is a recipe from my mom's good friend.
the first time i tasted this pâté i fell in love with it...everyone does!

...i didn't want to put easy in the title, since all of the recipes i post are easy, but it really is easy. i even compared it to pâté recipes in my cookbook and all of them had much more ingredients and were also more complicated.


ingredients:
300g ground pork liver (1 liver is approx 500-600g)
900g ground streaky pork (the bacon cut)
1 large finely chopped onion
20g salt
1 tsp peper
2 tsp of seasoning - i use either trader joe's 21seasoning salute or alnatura klare gemusebruhe
mason jars and lids

3 STEPS: 1. MIX thoroughly with your hands or in your kitchen aid - smaller portions and on low.
2. FILL jars only 2/3 full (if you fill it more, the juices will get under the lid and it won't be able to suction.
3. COOK - lightly boil for 2hrs.

notes and tips:
- for those of you who have a meat grinder, grind it yourself :)! - i have a grinder attachment to my favorite(!!!) kitchen appliance - kitchen aid :).
- if the lid doesn't end up suctioning, which has happened to me many times - put in freezer or give out to friends for ealry consumption :)!
- 1 liver makes a batch of approx 10 300ml jars(filled only 2/3!)

Tuesday, October 4, 2011

easy-peasy cake!

...so easy, even the kids can make it!

last week St turned 1(yay!!!)and this is the cake i made him. first thing he did was grab some piškoty - has one in his hand on the photo :)
Ji loves this cake and also enjoys making it! and even dad had second helpings....he doesn't have much of a sweet-tooth(more like meat-tooth...lol), so that means it really is really good! 

ingredients:
- piškoty - lady fingers
- 200ml whipping cream
- 200ml sour cream
- 1-2 tbs sugar
- fruit - canned/frozen/fresh - i used frozen strawberries and blueberries and canned mandarin oranges and peaches
- agar(optional)

- cake pan or if you don't want to make a "cake," you can just put it in bowls

directions:
- whip up the whipping cream with the sugar(i use vanilla sugar)
- gently stir in the sour cream *1
- start layering: 1. piškoty, 2. wc-sc, 3. fruit *2
- refridgerate *3
- agar layer according to the instructions *4
- decorate *5

* notes/tips:
1. the amount of creams vary depending on how many layers you want to make...i made 6 layers (2 of each) and used a 22cm cake mold. the ratio if wc/sc is up to you - the best thing to do is taste as you go along :)
2. for the first layer of piškoty, i fiil in the holes between the whole piskoty with broken up pieces. if you are using frozen fruit, make the cake with it still frozen, so it doesn't get soggy. if you are not going to add a final agar layer and you are using canned and/or frozen fruit -  after adding the fruit, spread another thin layer of cream on(so the fruit doesn't dry up).
3. usually a couple of hours will do...depending on the number of layers. if you are going to add agar, refridgerate for an hour or so, just to set it and get it cool before you add the agar.
4. i like mine thin, just to make a nice glaze. make it natural or add some fruit juice or syrup to add color.
5. after you take off the outer cake pan ring you can add some piškoty to the perimeter - the cream soaks through so it's moist enough to just stick them on.

p.s. this cake is also really good with just one type of fruit - like fresh strawberries...:)))

Thursday, September 15, 2011

Aronia berry syrup recipe

quite easy to make -  the worst part is the picking and mushing...

here, it is very popular to make and drink berry juices form syrup. last week i made my second batch of aronia syrup and it is sooo good. it's my second favorite, first is black current!

this is a recipe from my friend and it works for all kinds of berries:
- wash picked berries and mush them up with your fingers in a large pot - it is best to mush them in smaller amounts before adding more.
- fill the pot with water so it is leveled with the mushed berries(or just slightly above the berries)
- add a little bit of citric acid and mix - i used aout 2 tbsps for 5 liters of berries
- cover pot and let it sit for 24-48 hrs at room temp (beware - while fermenting the juice level will rise!)
- then strain the berry juice and try to squeeze out all of the remaining juice from berries (do it over the strainer)
- add sugar to the juice - 1kg sugar/1 liter of juice
then you can either make the non-boiled or boiled version, or both!:
(the non-boiled version is great because you don't loose any vitamins, but it doesn't last that long.)
- after adding sugar stir occasionally until dissolved.....took me about an hour. (good to do while doing another kithcen chore :)! i didn't want to take my chances, so i stored mine in the fridge. 3 liters lasted for about a week....we drank it all :)!
- for the boiled version - let boil for 5 minutes, stirring occasionally. fill glass bottles while still hot and cap.

p.s. aronia berries are very high in vitamin C and antioxidents :)!

Wednesday, August 10, 2011

we love wild mushroom: hunting...and eating!!!

mushroom hunting is like a treasure hunt!
since we have forests right behend our house, we go almost everyday :) ...Ji with his basket, me with baby St in my ergo(best baby carrier!), with a hiking pole (VERY helpful with carrying the extra weight ;) - used it during pregnancy too!) and even dad comes with us when he has time.
this photo is from 2 days ago. we only fould a couple but this one was worth it!
and they are delicious! - in soups, with scrambled eggs, pickled...yum!
p.s. for those of you who are not familiar with wild mushrooms, some can be very! poisonous!

Sunday, July 24, 2011

log pillows

a little wedding present for our friends
to keep them  w a r m  and  c o s y!!!
- log basket from a local basket maker
- very large log pillows made by me :)

Tuesday, July 5, 2011

plastic-bottle-marble-rattle

St has learned to crawl......so i'm constantly in the need of things to keep him busy to get anything(!!!) done around the house. when Ji was little, i learned that most of the time ordinary household items are far more interesting than real toys....or a combo of the two :)...


just water in the bottle was fun, but the marbles
swirling around (or both :) were even more fun :)

make sure the lid is on really tight!

the shadow of the bottle was pretty cool also...

Thursday, June 16, 2011

sock-pea-bags

i've had a bunch of boys' socks in need of toe-repair in my "repair basket" for a couple of months(!!!) and had been contemplating, if i should repair them or just up/down cycle them as cleaning rags, when the other day i got the idea of making quick and easy play pea-bags out of them...didn't have beans at home ;)

Ji had fun filling them.....and chasing all the run-away peas :)

we had fun throwing them into a basket and cardboard-box-lion's-mouth (easy!). and even dad joined us on this one!
1.sew the bottom seam with sewing machine
2. fill with peas ;)                         
3.pin the top part(to hold the peas in place)
4. sew the top seam
5. cut off excess fabric
(6. ...now use the scraps as cleaning rags :)

Saturday, May 28, 2011

antipasta salad :))!

it's asparagus season here now and i loooove asparagus! this is a wonderful recipe i learned from a highschool friend - it's easy, refreshing and very yummy!

serves 4:
- cooked pasta  500g
- steamed asparagus  500g
- cherry tomato 300-400g
- eidam or cheddar cubes 200g
- sliced ham (the real kind!)  150g
- homemade italian dressing - here (i use fresh basil and don't add peppers)


p.s. it's a cold (room temp.) salad - mix the "warm" ingredients together after cooled to room temp...the cheese is not supposed to melt!
dobrou chuť!!!

Sunday, May 22, 2011

shoe box pull toy

Ji loves pulling and pushing things around our house all of the time, and i always save shoe boxes, so we decided to make a pull toy. we made our Mates :). a bus would be cute too!                                       
Ji puts all kinds of things in it: wooden blocks, stuffed animals, even his cars :) 


tip: we glued 4 feet on to the bottom - 3 squares of thicker cardboard glued together, so he would be a little elevated and wouldn't drag his stomach on the ground, plus a piece of felt on each to make it less :) noisy!

we also made a bowl of water and some paper dog food and 
Mates even came to see if it was real - it was so funny!:)) 

Friday, April 29, 2011

tiny glass cars :)


aren't these glass cars cute ? ! ! ! they were made as a custom
order for me by a czech glass artist David Johanes - his shop.

...two weeks ago when we were on a mini vacation with my mom and the boys at the Karlova Studanka spa(which was by the way super!) we came across a shop that sold the cutest tiny glass animals made by a local artist. we bought a couple of them - Ji picked out some fish, a snail for St a ladybug for me and some others as presents for upcoming friends' birthdays. and right then i knew that if the animals were so cute, that tiny cars would be also! so i contacted the artist and he was so willing and upon my request made these - they're a cross bug-citroen :) 

Thursday, April 21, 2011

simple paper daffodils

tools:
- color paper
- glue stick
- scissors - straight and zig-zag
- cylinder of some sort - pencils
   or markers work well
- wooden skewers (optional)


directions:
- cut out yellow flower leaves - the easiest is to cut out circles and then cut triangle wedges :)
- cut strips of orange paper (one edge zig-zaged) long enough to wrap around your marker, having the short edges overlap a little. apply a "stripe" of glue to one short edge, wrap paper around the marker (zig-zag end to the center of the tube) and press overlapping edges firmly to let the glue set. then move your paper roll so that the end sticks out and start folding the end inward as i started on the photo to create the bottom of the "cup" - start with the overlapping glued edges). before you fold the last part, apply glue to it and then press to a flat surface to set glue and have it as flat as possible. then apply glue to the bottom of the "cup" and glue to the flower :)...when you glue it on, it should slip off of the marker.
- then make stems and leaves of your choice! - cut strips of green paper and tape daffodils to your windows and walls, or glue onto skewers and put them in a vase or for areas with low chance of rain (this is especially for my sis ;)!) "plant" them into your lawn :)....careful if you have sprinklers ;)

for green skewer stems:
- cut a strip of green paper, apply glue to the top end and start rolling it onto the skewer - use an angel similar to the one on the photo. tip - i use my bottom hand to hold the paper in place and the top hand to roll it.
- before you get to the end, apply glue to the end and roll the end on.
- cut up little yellow squares, and with the skewer in the center of it¨, glue it on to the flower.

Wednesday, April 13, 2011

confetti balloon play

what you need: 
- balloon - at least somewhat see-through
- paper
- hole-punch or scissors
- funnel or tube of some sort
- string


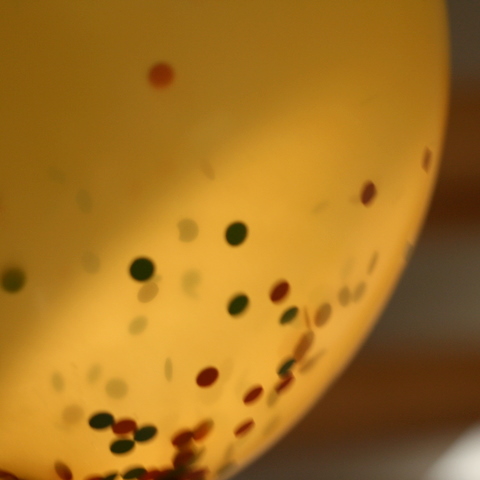
- make some confetti - using a hole-punch or just cut up some tiny strips of paper
- insert a funnel or tube into the mouth of your balloon
(i used a thread bobbin tube) and pour your confetti into the balloon
- blow up balloon and tie a string on and tape/tie to your ceiling/ceiling beam
- play time!


both Ji and St had fun with it....well, i did too! Ji and i ping-ponged it to each other which amused St, then St played with it which amused us :) - i put him within hand's reach of the balloon (...he had the most fun, when he was in his bouncer) and he waved his little hands and feet trying to hit it. and when he succeeded he started screeching with joy - it was so cute :)